一覧上でステータスを「未完了」から「完了」に更新することはよくあります。
ですが、「完了」にした後は「未完了」に戻せないようにしたい、と思ったことはありませんか?
本記事では一覧機能の“裏ワザ”第三弾として、ステータスの値に応じて一覧編集モードを非活性にする方法を紹介します。
※本方法を適用するには、xslファイルのソースを一部編集する必要があります。編集前にはバックアップを取ることをおすすめします。
完成イメージ
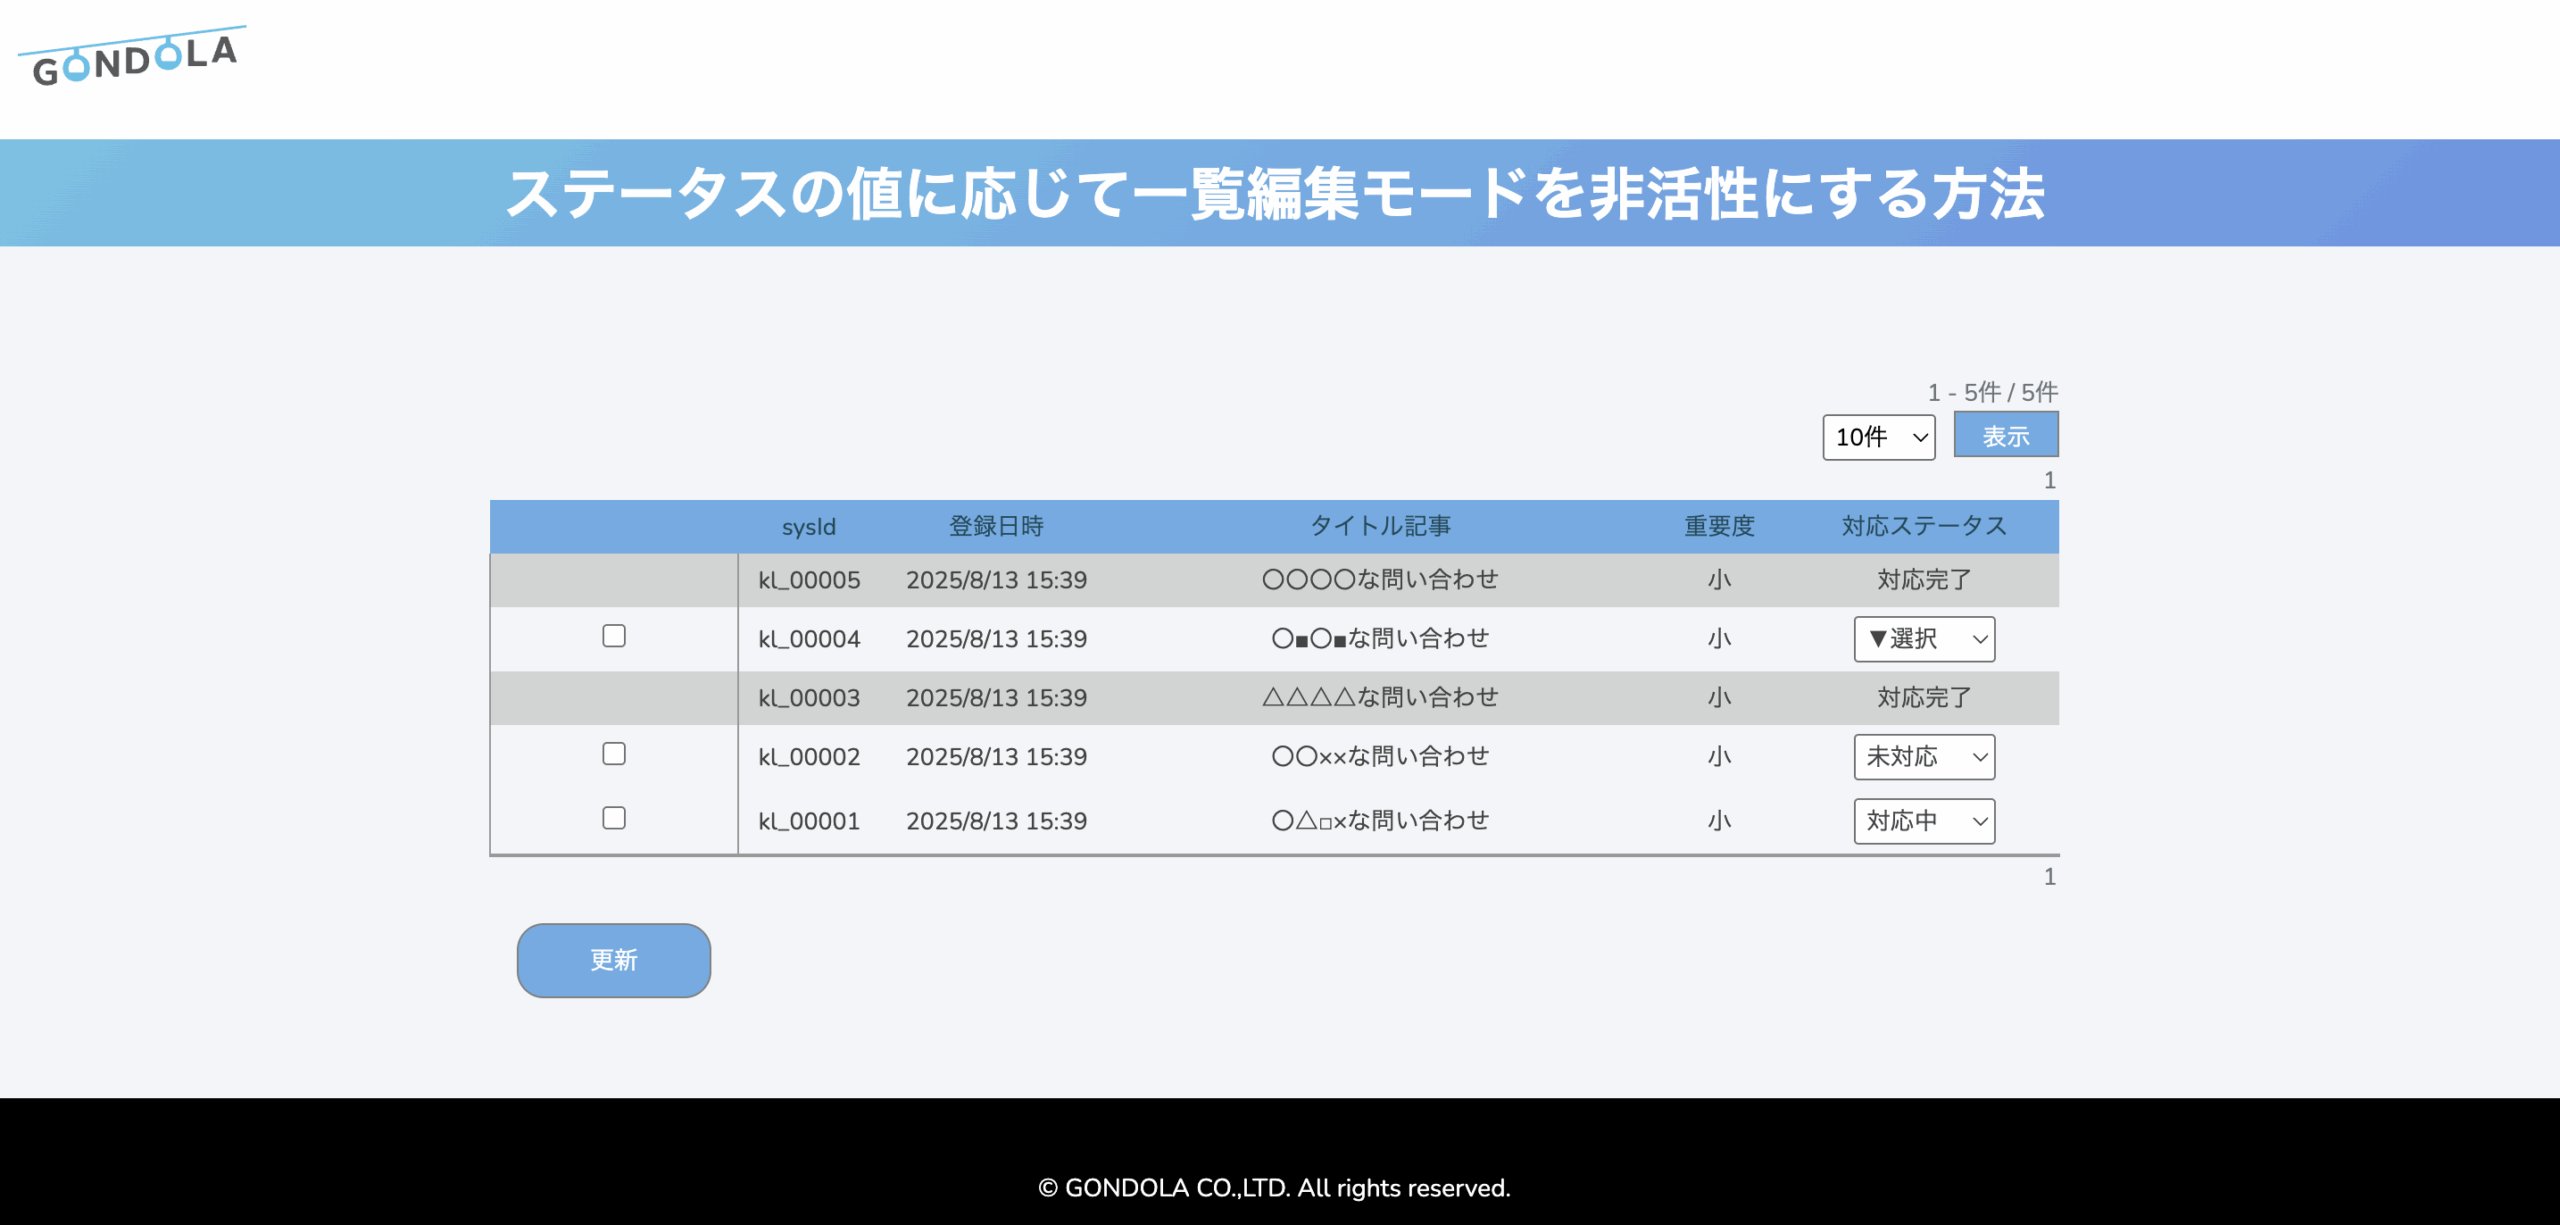
上記例では、ステータスが「対応完了」の行のみグレーアウトで表示しています。
それ以外のステータスは編集モードで更新できるようにしました。
さらに、編集可否にあわせてチェックボックスの表示/非表示も出し分けています。
次項から、特定の値に応じて編集モードを切り替える方法を説明します。
作業手順
1. 一覧設定を「ソースデザイン」に変更
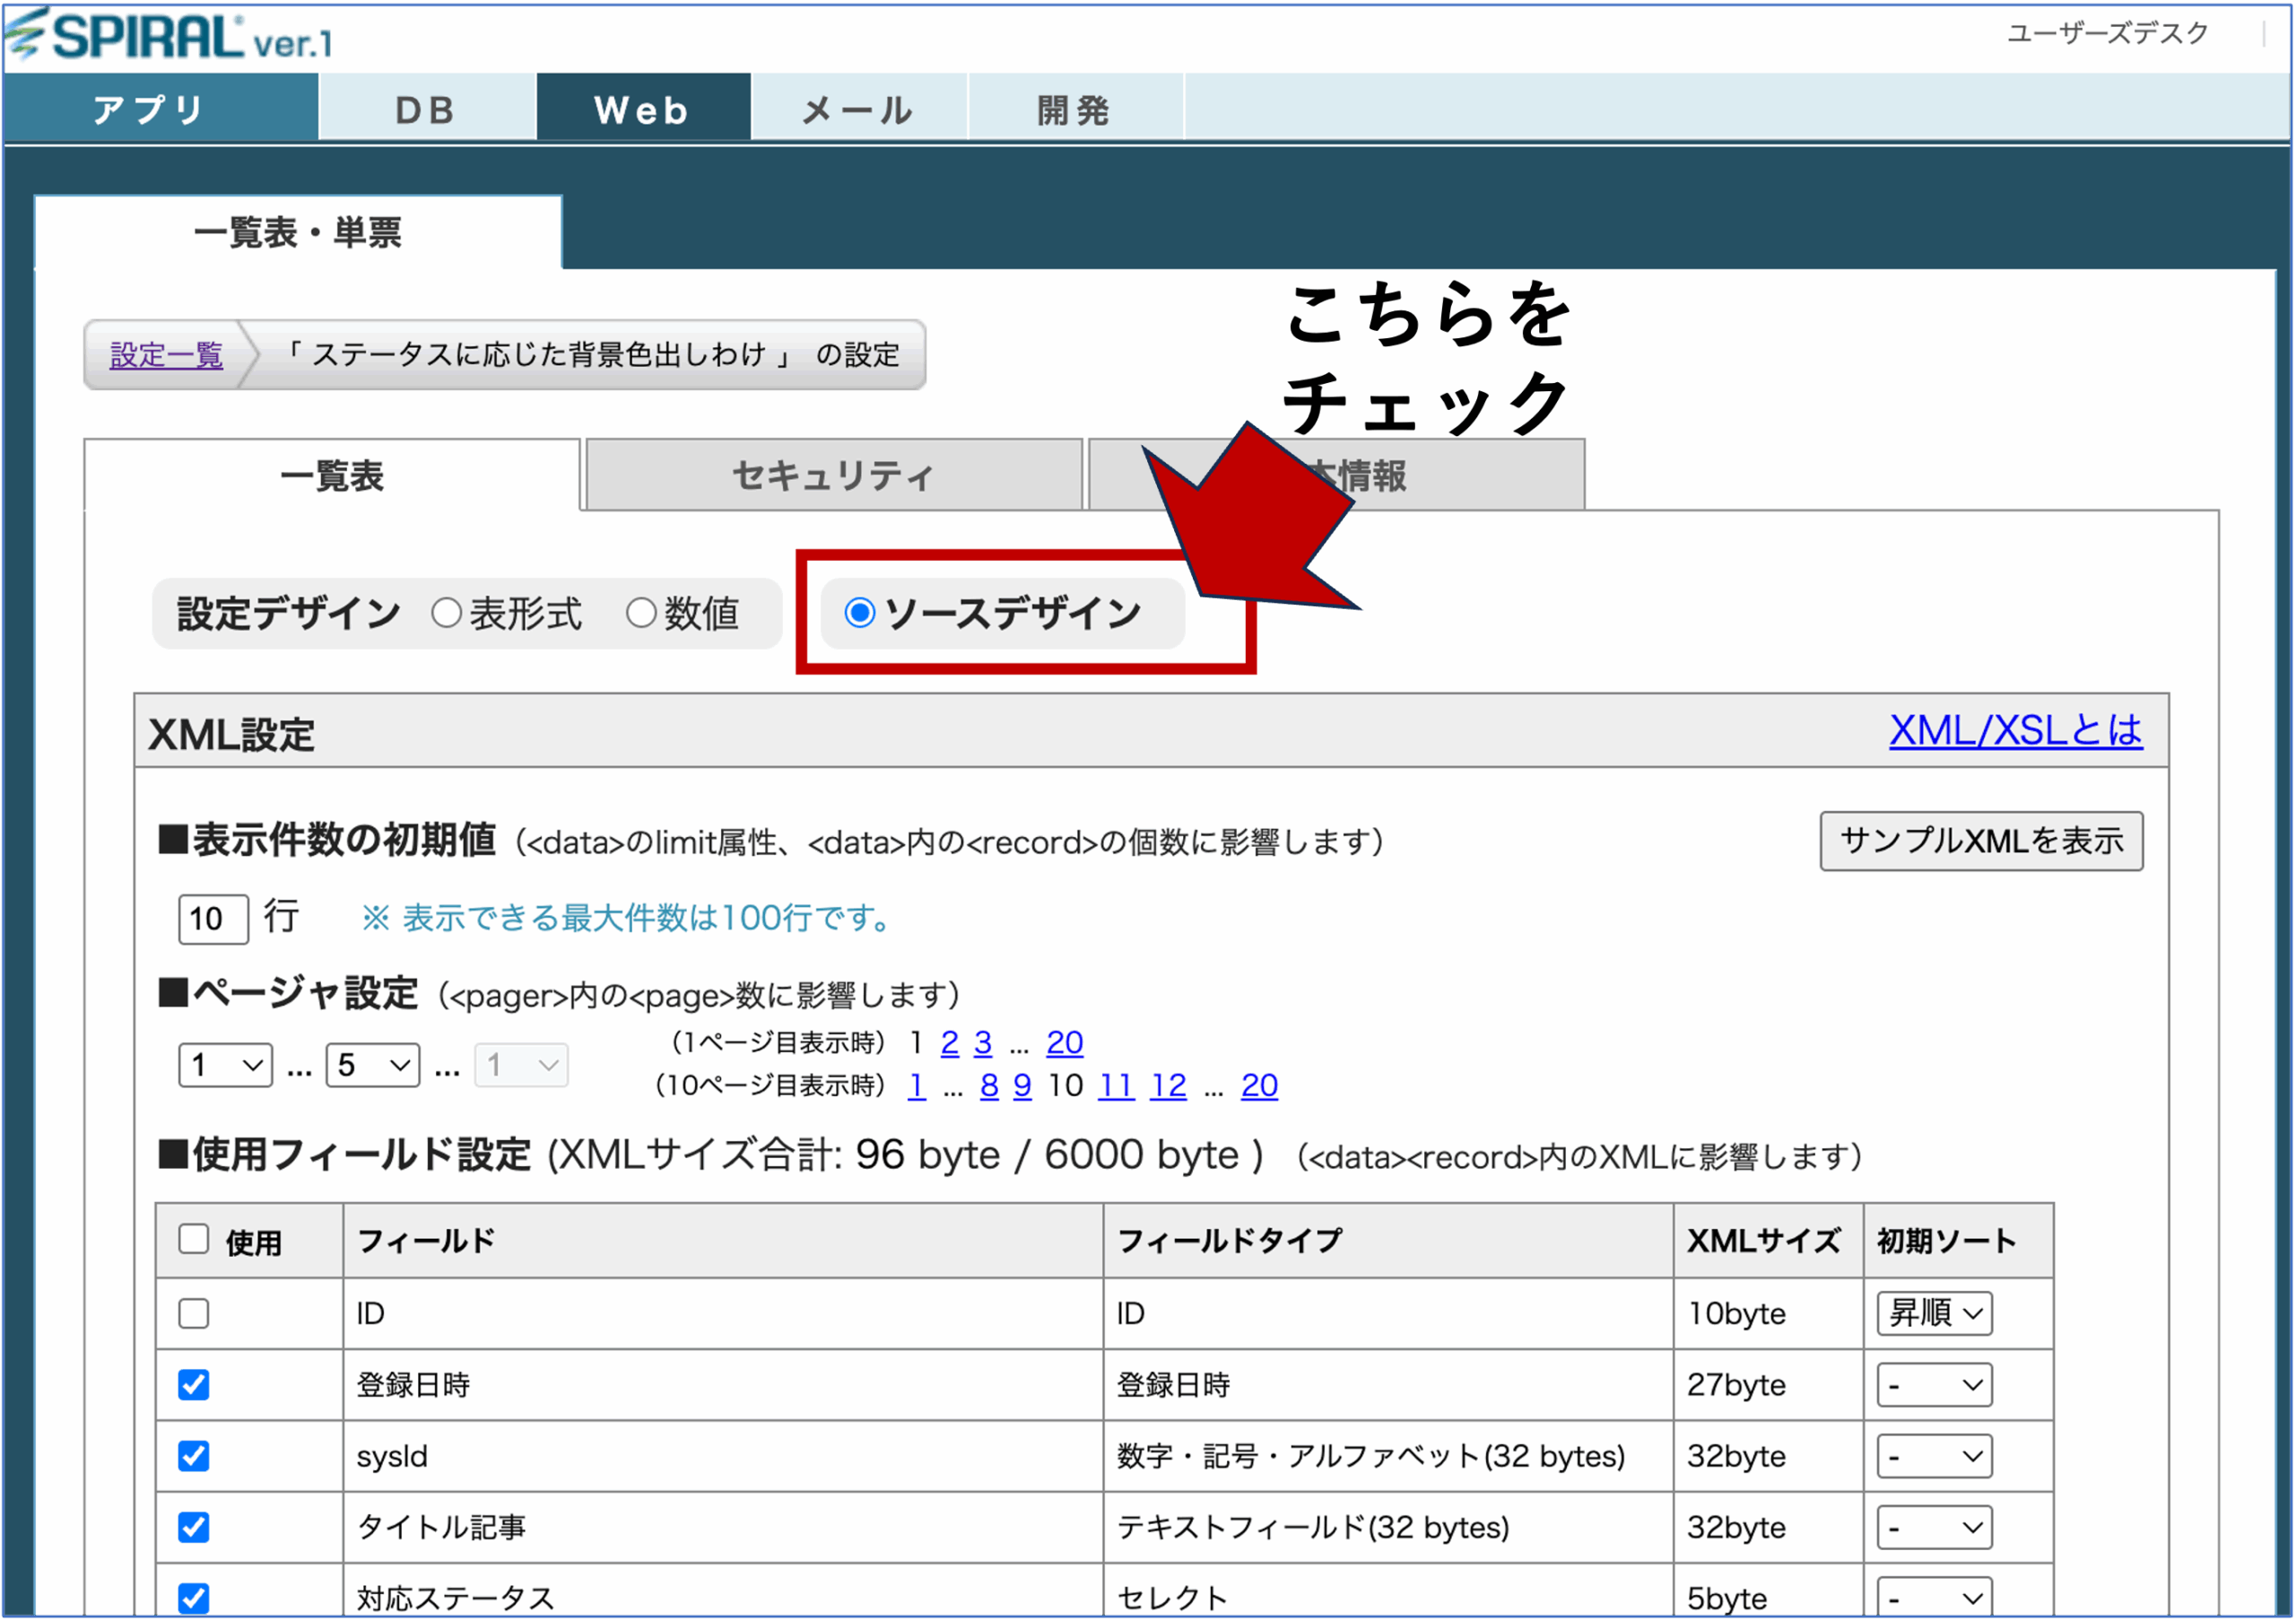
まずは通常どおり、デフォルトの一覧機能を作成します。
一覧の作成方法はこちら
作成後、「ソースデザイン」に切り替えます。
一覧はデフォルト機能で完成させてからソースデザインに切り替えることが重要です。
切り替え後は修正時に手戻りが発生しやすくなるため注意しましょう。
2. xslの編集(背景色)
ステータスが「対応完了」の行は背景色をグレーにして強調します。
下記に記載例と解説を示します。
<xsl:attribute name="style">
  <xsl:choose>
    <xsl:when test="usr_status = '対応完了'">
      border-width:0px 1px; ... background-color:#D3D3D3;
    </xsl:when>
    <xsl:when test="position() mod 2 = 1">
      border-width:0px 1px; ... (背景色なし)
    </xsl:when>
    <xsl:otherwise>
      border-width:0px 1px; ... background-color:#F2F5F8;
    </xsl:otherwise>
  </xsl:choose>
</xsl:attribute>
xsl:chooseを使ってスタイルを分岐させています。
3. xslの編集(チェックボックス)
次に、チェックボックスの表示を条件分岐させます。
各行にチェックボックスを設置しますが、ステータスが「対応完了」の場合は非表示にします。
<xsl:choose>
  <xsl:when test="usr_status = '対応完了'">
    <!-- 何も表示しない -->
  </xsl:when>
  <xsl:when test="position() mod 2 = 1">
    <input type="checkbox" ... />
  </xsl:when>
  <xsl:otherwise>
    <input type="checkbox" ... />
  </xsl:otherwise>
</xsl:choose>
xsl:chooseを使ってセルの内容を分岐させています。
4. xslの編集(ステータス列)
ステータスのデータ行も編集します。
「対応完了」の場合は編集不可にし、それ以外の場合はプルダウンを表示して変更できるようにします。
<xsl:choose>
  <xsl:when test="usr_status = '対応完了'">
    <xsl:value-of select="usr_status" />
  </xsl:when>
  <xsl:when test="position() mod 2 = 1">
    <!-- プルダウン生成 -->
  </xsl:when>
  <xsl:otherwise>
    <!-- プルダウン生成 -->
  </xsl:otherwise>
</xsl:choose>
xsl:chooseを使ってスタイルを分岐させています。
selectを生成し、ステータスを変更可能に5. 全体ソースのイメージ
<!-- ▽データ行:チェックボックスの箇所を抜粋 -->
<td class=" smp-cell-{$row}-1 smp-cell smp-cell-row-{$row} smp-cell-col-1" align="center">
  <!-- 属性の条件分岐 start -->
  <xsl:attribute name="style">
    <xsl:choose>
      <!-- ▽追記箇所:背景色をグレーに変更 -->
      <xsl:when test="usr_status = '対応完了'">
        border-width:0px 1px;border-style:solid;border-color:#999999;padding:5px;font-size:10pt;color:#444444;background-color:#D3D3D3;
      </xsl:when>
      <!-- △追記箇所:背景色をグレーに変更 -->
      <xsl:when test="position() mod 2 = 1">
        border-width:0px 1px;border-style:solid;border-color:#999999;padding:5px;font-size:10pt;color:#444444;
      </xsl:when>
      <xsl:otherwise>
        border-width:0px 1px;border-style:solid;border-color:#999999;padding:5px;font-size:10pt;color:#444444;background-color:#F2F5F8;
      </xsl:otherwise>
    </xsl:choose>
  </xsl:attribute>
  <!-- △属性の条件分岐 end -->

  <!-- ▽追記箇所:セル内の内容(チェックボックス) -->
  <xsl:choose>
    <xsl:when test="usr_status = '対応完了'">
    </xsl:when>
    <xsl:when test="position() mod 2 = 1">
      <!-- 下記inputタグは元ソースそのまま転記 -->
      <input type="checkbox" name="smp-table-check-{/table/@tableId}" id="smp-table-check-{/table/@tableId}-{@id}" class="smp-table-check" value="{@id}" onclick="SpiralTable.targetCheck({/table/@tableId}, {@id}, this.checked)" onkeydown="return SpiralTable.keyCheck(event);" />
    </xsl:when>
    <xsl:otherwise>
      <!-- 下記inputタグは元ソースそのまま転記 -->
      <input type="checkbox" name="smp-table-check-{/table/@tableId}" id="smp-table-check-{/table/@tableId}-{@id}" class="smp-table-check" value="{@id}" onclick="SpiralTable.targetCheck({/table/@tableId}, {@id}, this.checked)" onkeydown="return SpiralTable.keyCheck(event);" />
    </xsl:otherwise>
  </xsl:choose>
  <!-- △追記箇所:セル内の内容(チェックボックス) -->
</td>
<!-- △データ行:チェックボックスの箇所を抜粋 -->


<!-- ▽データ行:ステータスの箇所を抜粋 -->
<td class="smp-cell-data smp-cell-{$row}-6 smp-cell smp-cell-row-{$row} smp-cell-col-6" align="center">
  <!-- ▽属性の条件分岐 -->
  <xsl:attribute name="style">
    <xsl:choose>
      <xsl:when test="usr_status = '対応完了'">
        border-width:0px 1px;border-style:solid;border-color:#999999;padding:5px;font-size:10pt;color:#444444;background-color:#D3D3D3;
      </xsl:when>
      <xsl:when test="position() mod 2 = 1">
        border-width:0px 1px;border-style:solid;border-color:#999999;padding:5px;font-size:10pt;color:#444444;
      </xsl:when>
      <xsl:otherwise>
        border-width:0px 1px;border-style:solid;border-color:#999999;padding:5px;font-size:10pt;color:#444444;background-color:#F2F5F8;
      </xsl:otherwise>
    </xsl:choose>
  </xsl:attribute>
  <!-- △属性の条件分岐 -->

  <!-- ▽追記箇所:セル内の内容(ステータス) -->
  <xsl:choose>
    <xsl:when test="usr_status = '対応完了'">
      <xsl:value-of select="usr_status" />
    </xsl:when>
    <xsl:when test="position() mod 2 = 1">
      <select name="smp-uf-{/table/fieldList/field[@title='status']/@code}-{@id}" onchange="SpiralTable.changeBC(this);"
        onfocus="SpiralTable.targetCheck({/table/@tableId},{@id});" style="font-size:10pt;color:#444444;">
        <xsl:if test="string(usr_status/@hasError) = 't'">
          <xsl:attribute name="class">smp-valid-err-input</xsl:attribute>
        </xsl:if>
        <xsl:variable name="selected" select="usr_status/@id" />
        <xsl:for-each select="/table/fieldList/field[@title='status']/label">
          <option value="{@value}">
            <xsl:if test="string(@value) != ''">
              <xsl:attribute name="title"><xsl:value-of select="." /></xsl:attribute>
            </xsl:if>
            <xsl:if test="@value = $selected">
              <xsl:attribute name="selected">selected</xsl:attribute>
            </xsl:if>
            <xsl:value-of select="." />
          </option>
        </xsl:for-each>
      </select>

    </xsl:when>
    <xsl:otherwise>
      <select name="smp-uf-{/table/fieldList/field[@title='status']/@code}-{@id}" onchange="SpiralTable.changeBC(this);"
        onfocus="SpiralTable.targetCheck({/table/@tableId},{@id});" style="font-size:10pt;color:#444444;">
        <xsl:if test="string(usr_status/@hasError) = 't'">
          <xsl:attribute name="class">smp-valid-err-input</xsl:attribute>
        </xsl:if>
        <xsl:variable name="selected" select="usr_status/@id" />
        <xsl:for-each select="/table/fieldList/field[@title='status']/label">
          <option value="{@value}">
            <xsl:if test="string(@value) != ''">
              <xsl:attribute name="title"><xsl:value-of select="." /></xsl:attribute>
            </xsl:if>
            <xsl:if test="@value = $selected">
              <xsl:attribute name="selected">selected</xsl:attribute>
            </xsl:if>
            <xsl:value-of select="." />
          </option>
        </xsl:for-each>
      </select>
    </xsl:otherwise>
  </xsl:choose>
  <!-- △追記箇所:セル内の内容(ステータス) -->
</td>
<!-- △データ行:ステータスの箇所を抜粋 -->
編集が完了したら、一覧画面を表示して挙動を確認しましょう。
まとめ
xsl:chooseを使って条件分岐を設定するおわりに
値に応じて編集モードや閲覧モードを切り替えることで、ユーザーにとって使いやすく安全な画面を実現できます。
条件式を工夫すれば、さらに柔軟なカスタマイズも可能です。
ぜひ実装してみてください。