ステップアンケートは、PC向けまたは携帯電話向けのデザインのみ対応しており、スマートフォン向けのデザインには対応していません。
本記事では、CSSやHTMLを調整することで、スマートフォンからも見やすいデザインに変更する方法をご紹介します。
カスタムデザイン設定前の注意事項
本記事で紹介するカスタマイズは、PC向けのステップアンケートを対象としています。
デザインを反映させる際は、対象がPC端末のステップアンケートに適用の上お試しください。
あわせて、デフォルトデザインと本記事の内容を反映したデザインを比較できるデモサイトもご用意しています。
ぜひご確認ください。
「Qx.(質問ページ)」の設定
マルチデバイスに設定するためには、各質問表設定のページを編集する必要があります。
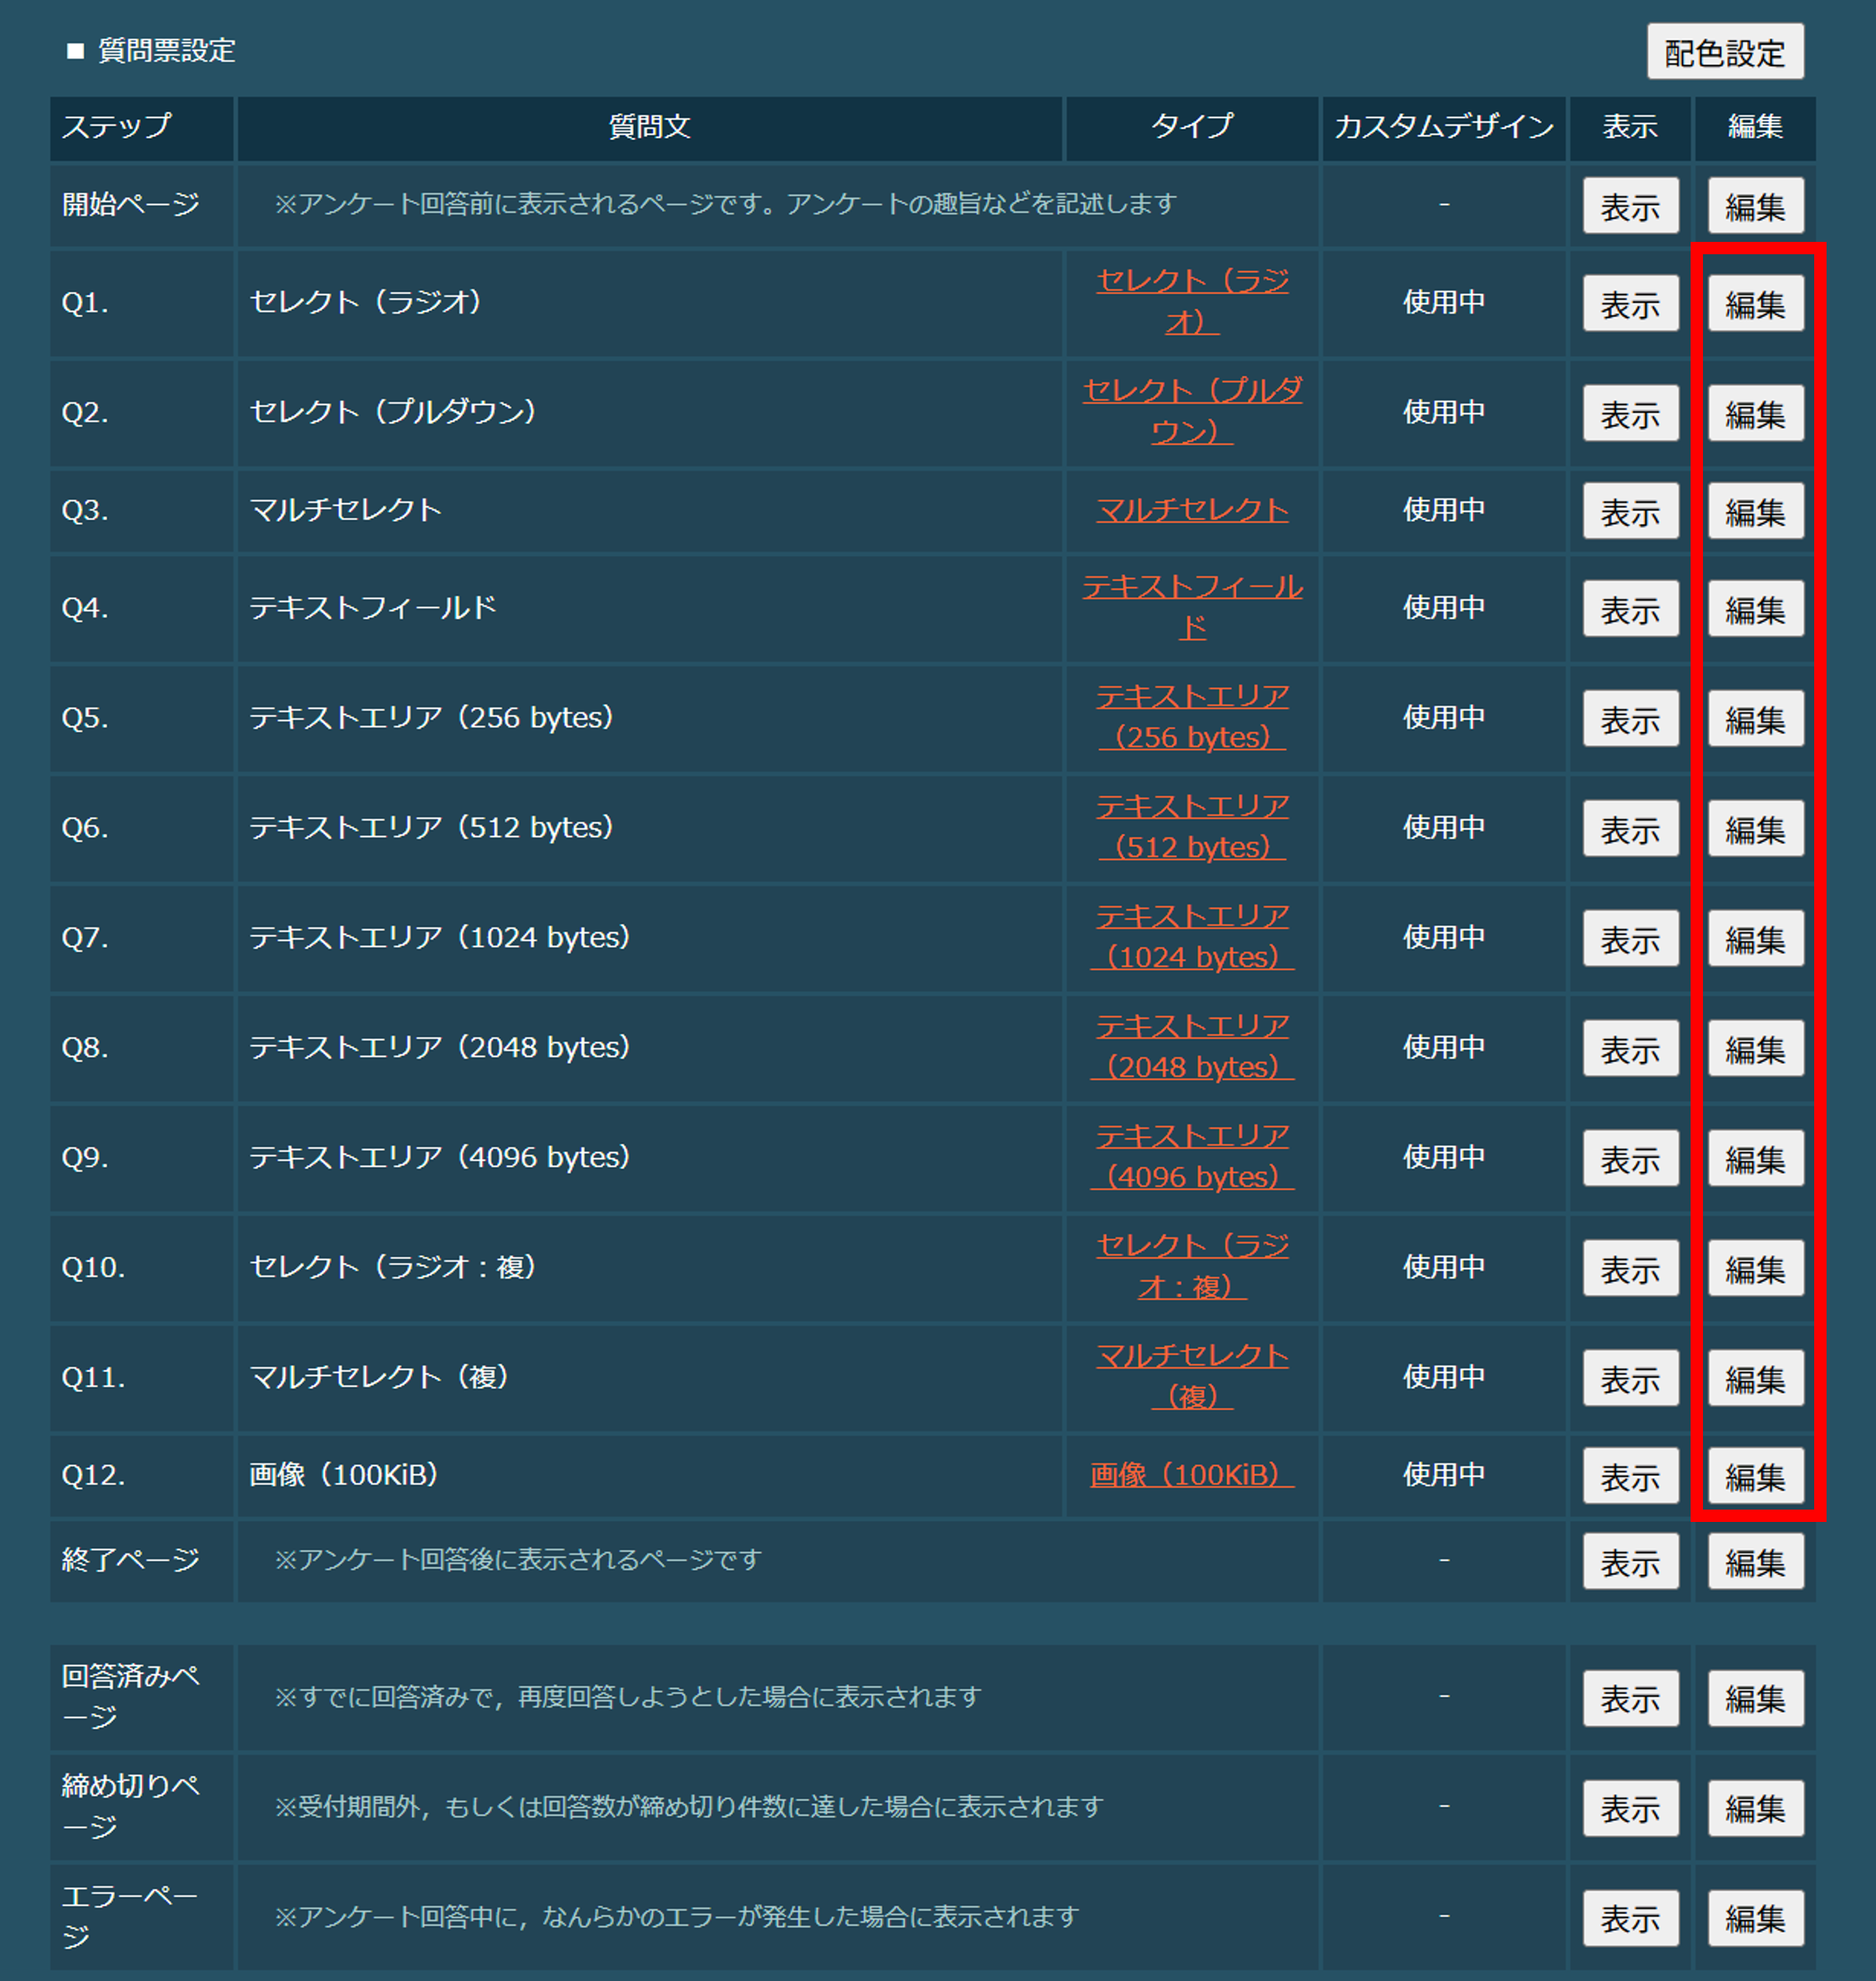
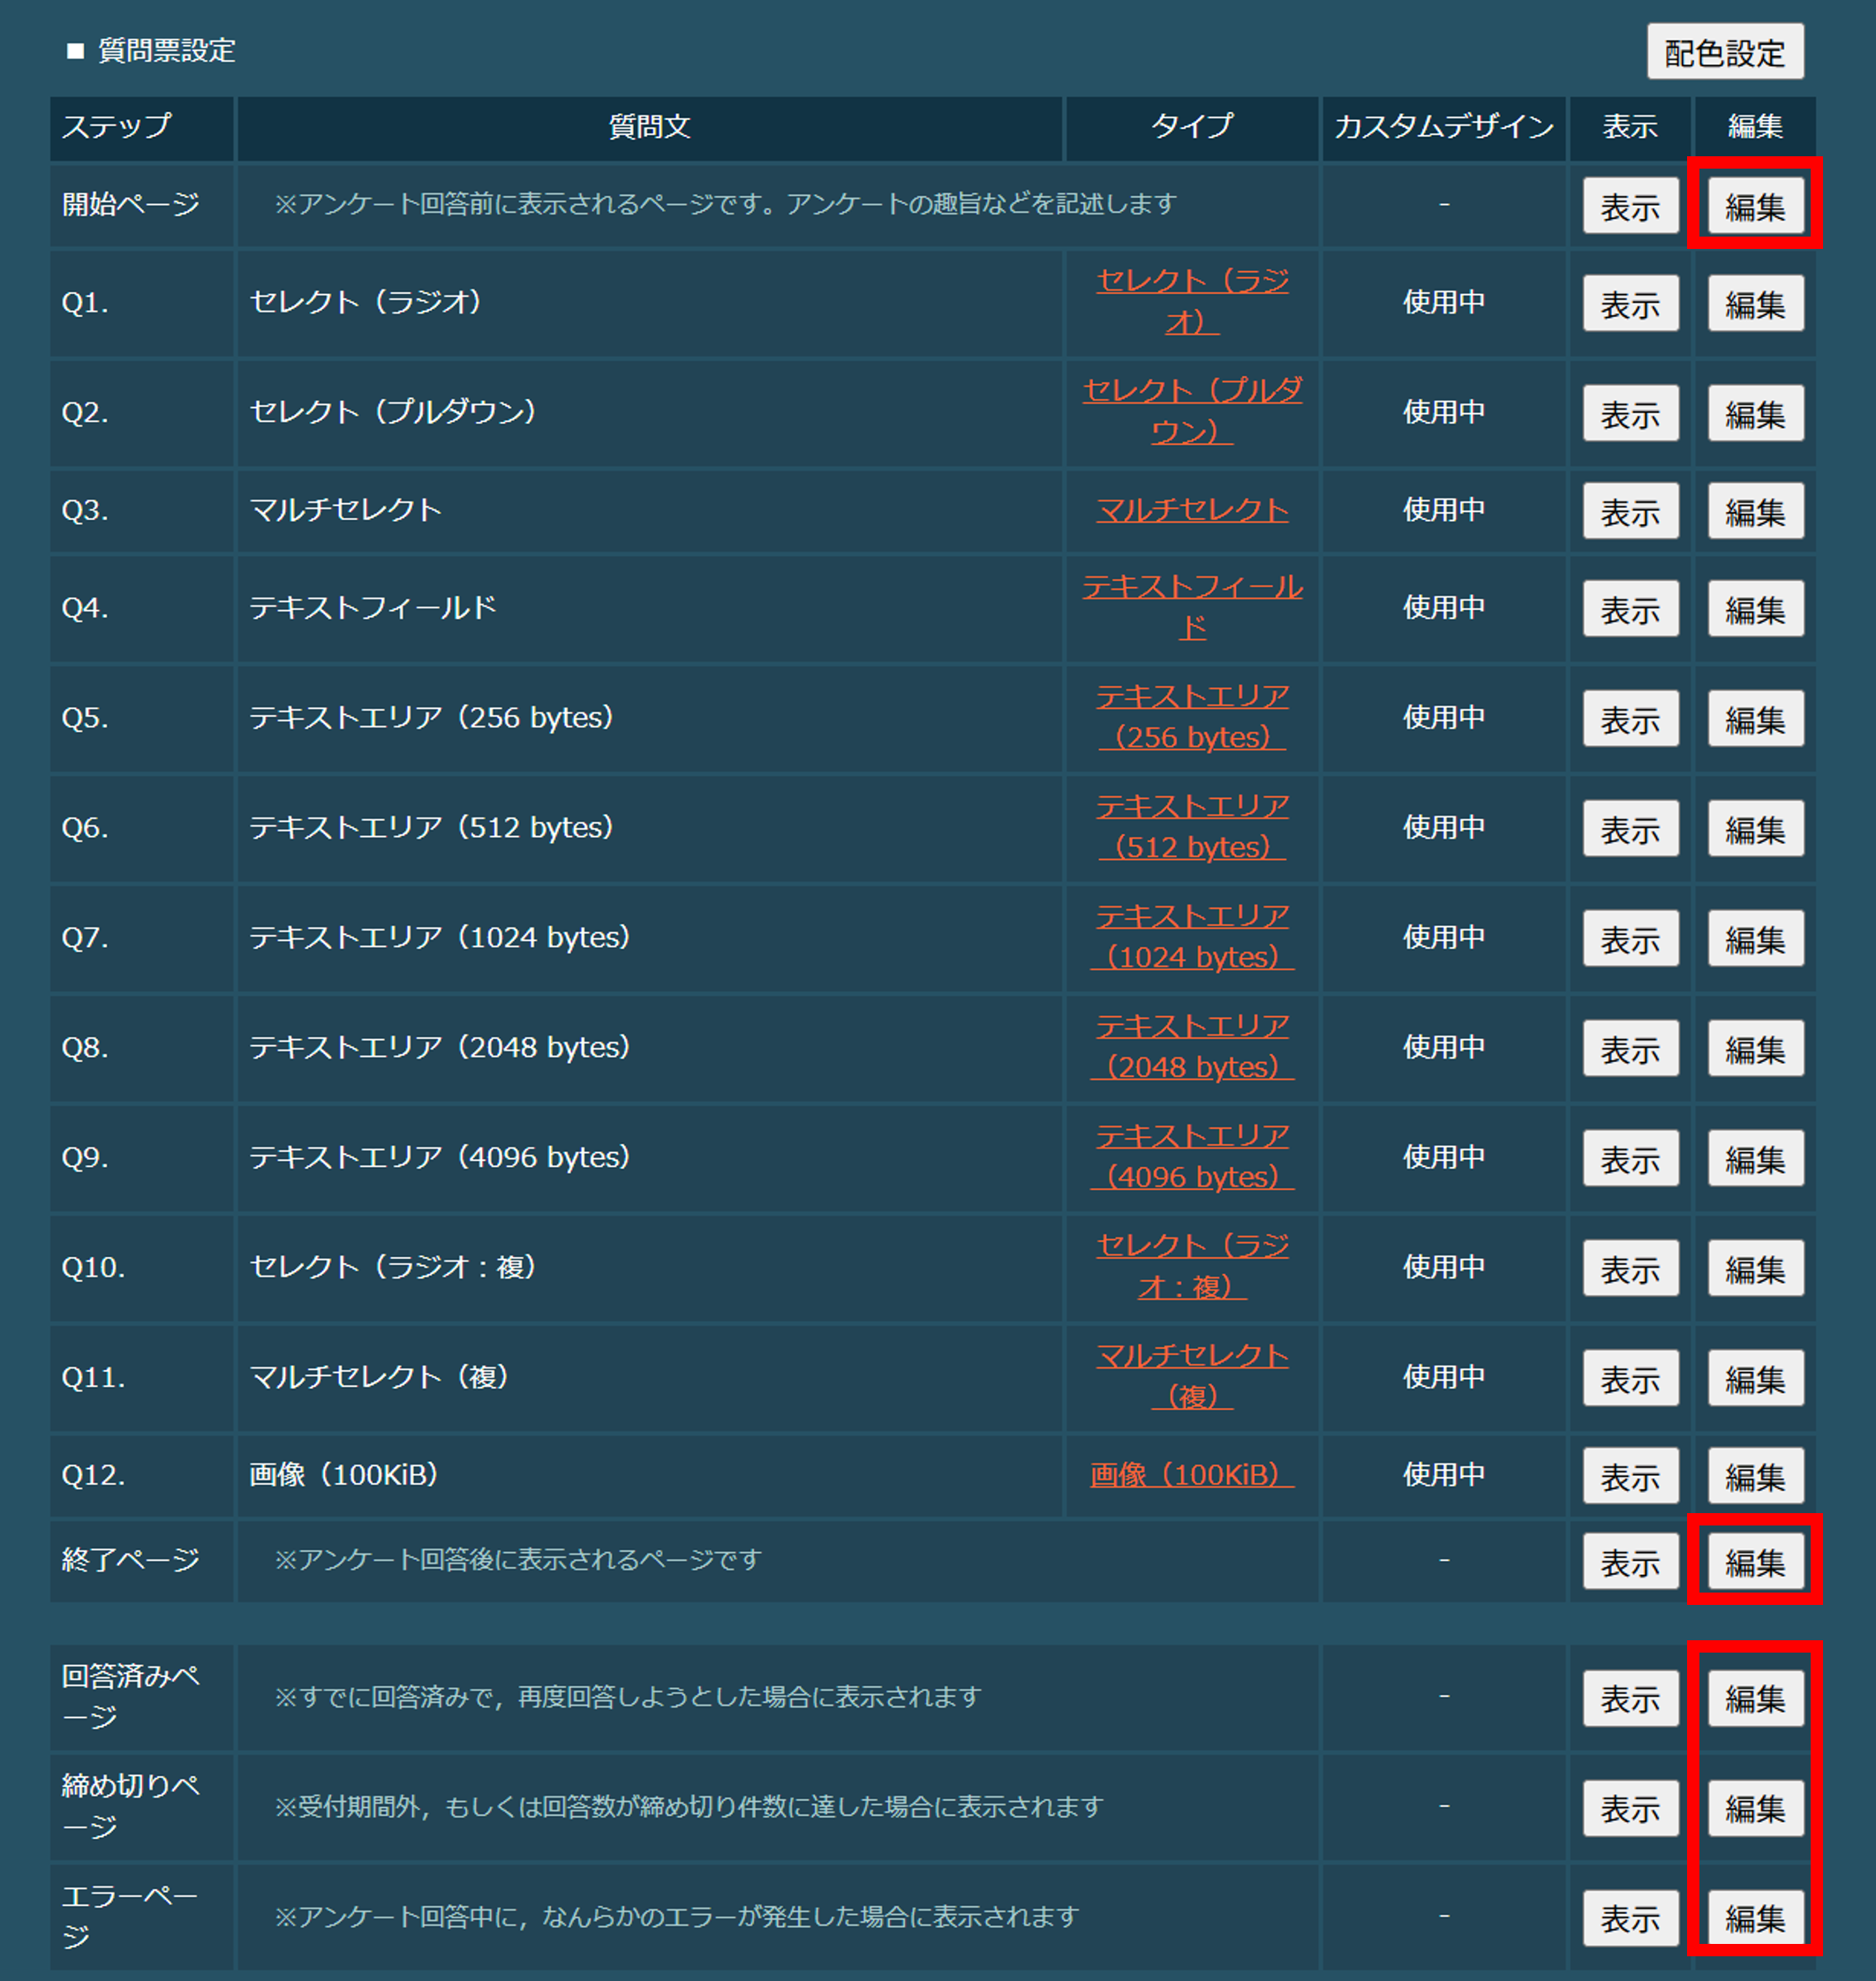
SPIRAL管理画面のWeb>ステップアンケート>画面設定>質問票設定より、各ページの編集を行います。
まず、「Qx.(質問ページ)」の設定をいたします。
編集対象のページ
編集手順
編集手順は、下記画像の①~④の順番で操作します。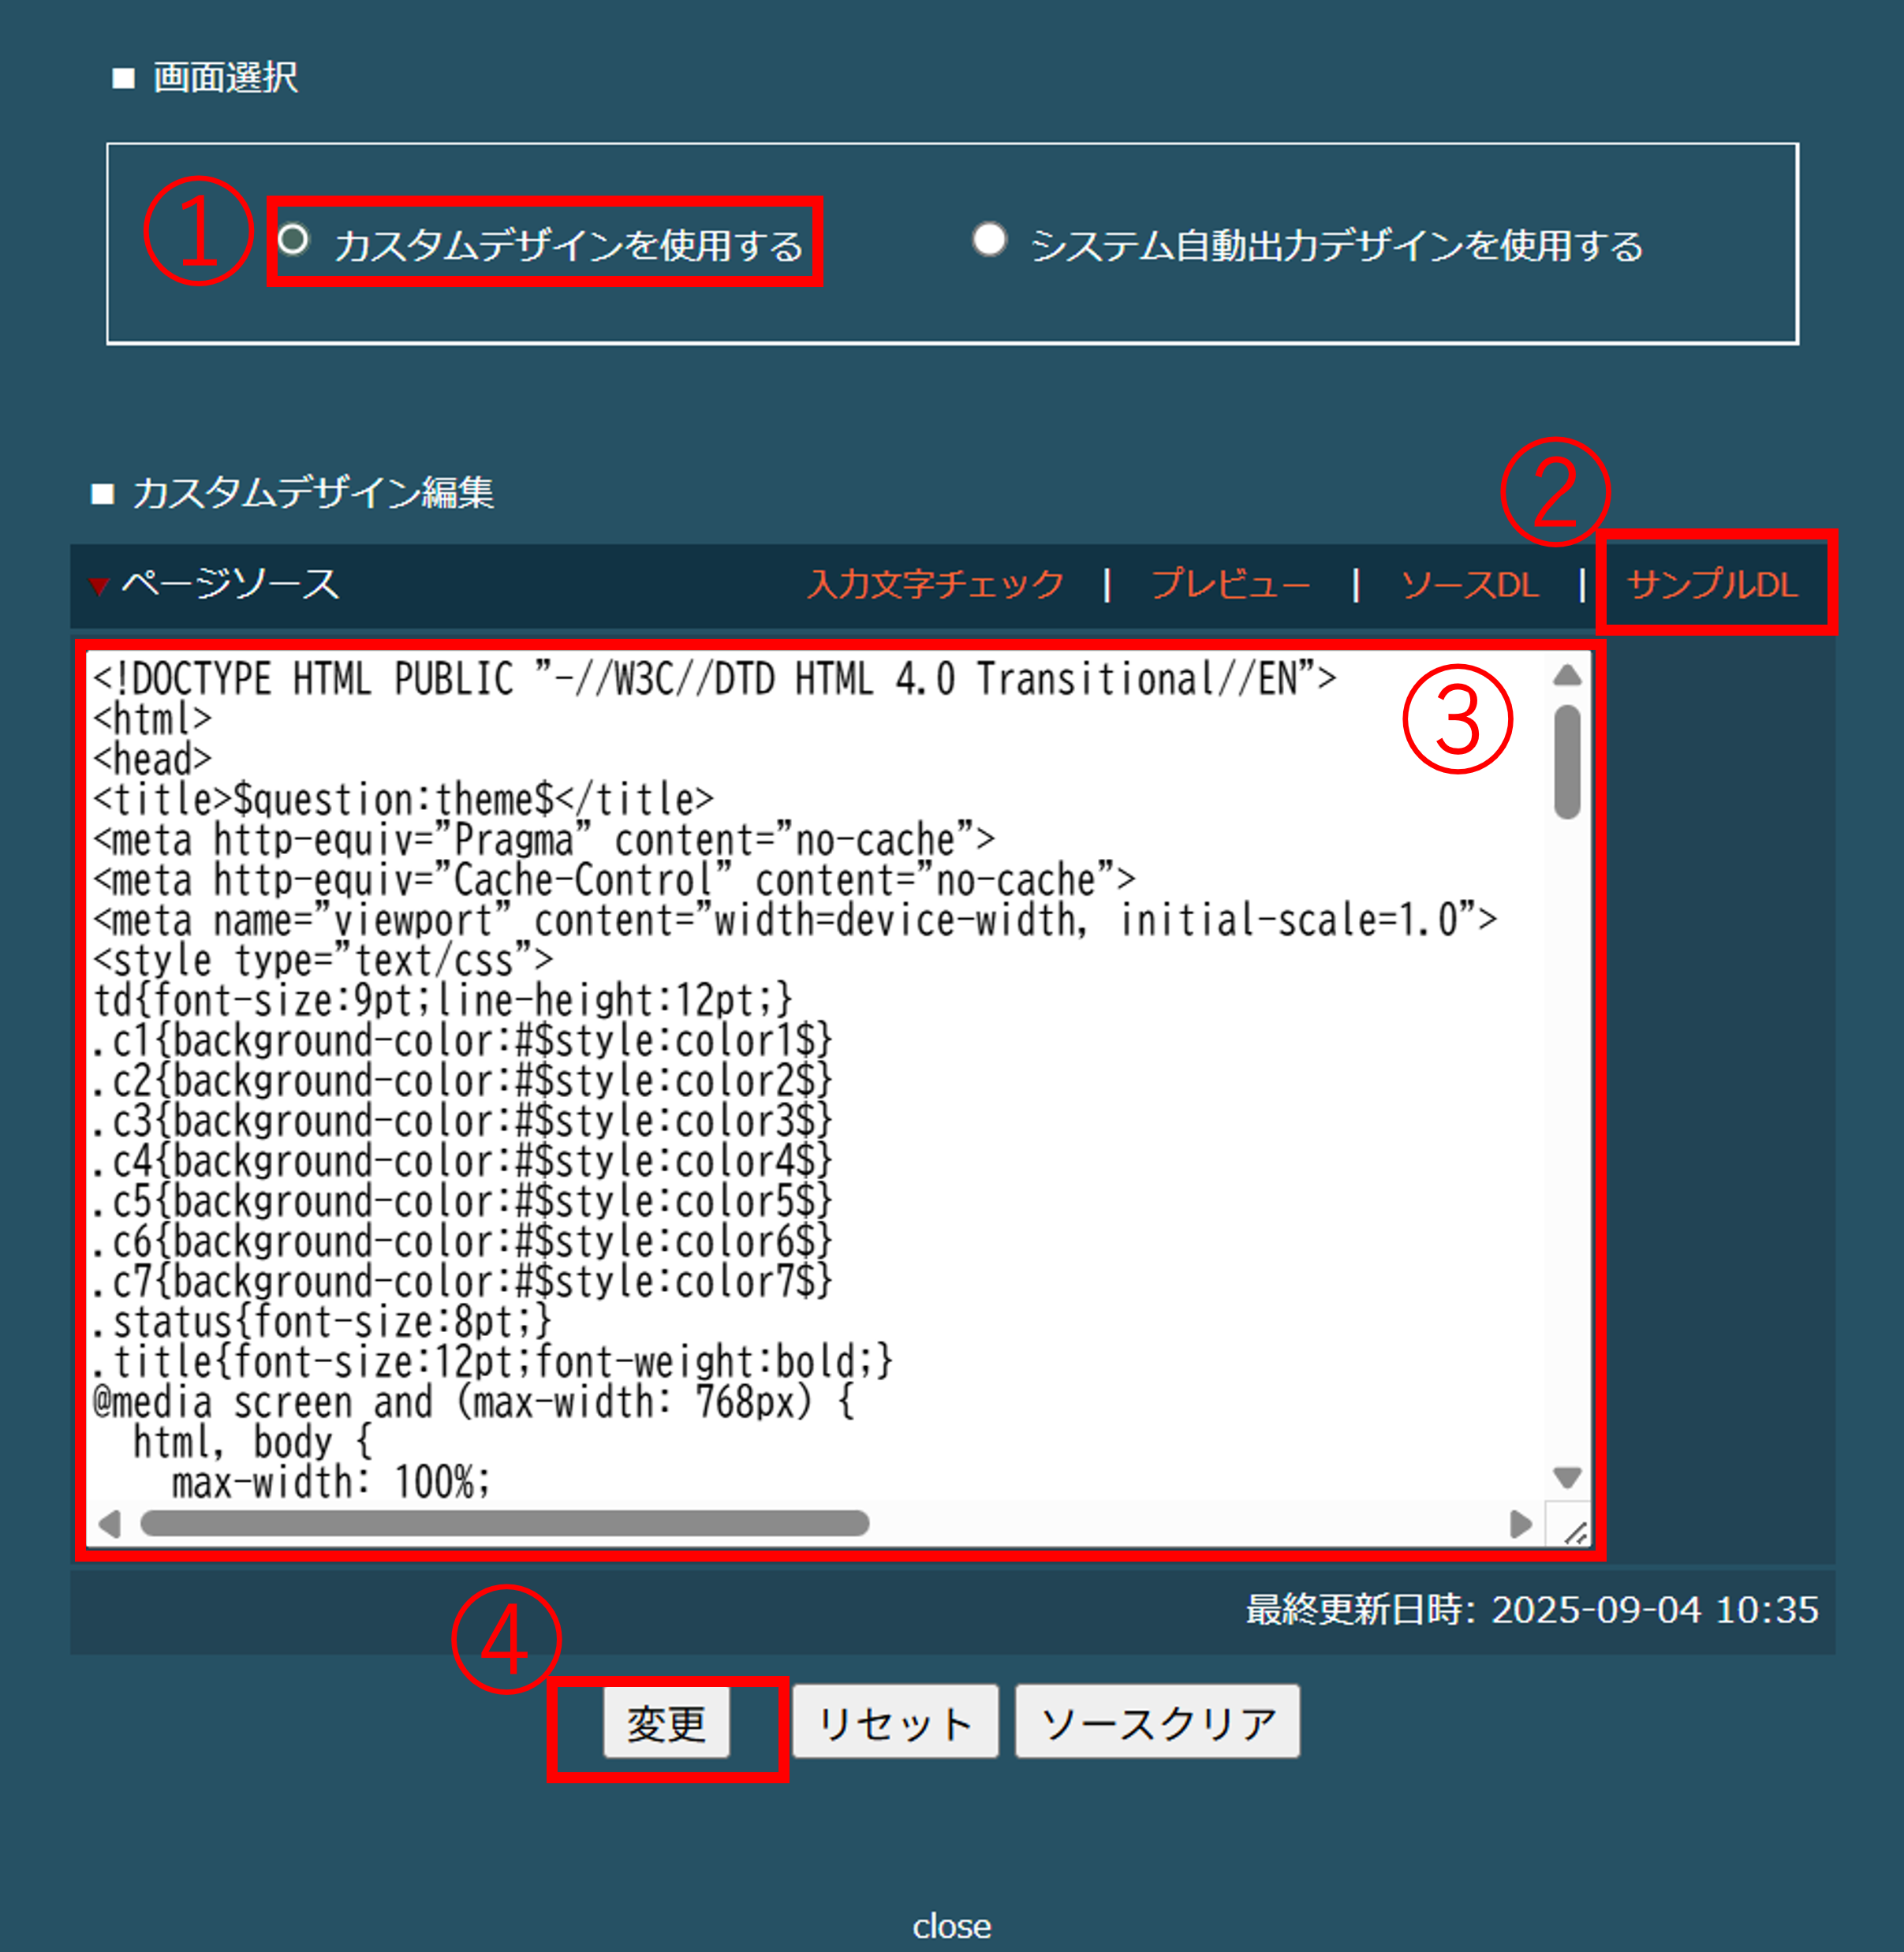
1.画面選択より「カスタムデザインを使用する」に変更する
2.カスタムデザイン編集より、「サンプルDL」をクリックしてページソースをダウンロード
3.ダウンロードしたページソースを張り付け、下記内容に編集
コード:headタグの中に追記:meta
<meta name="viewport" content="width=device-width, initial-scale=1.0">
コード:headタグの中を変更:style
<style type="text/css">
td {
  font-size: 9pt;
  line-height: 12pt;
}

.c1 { background-color: #$style:color1$ }
.c2 { background-color: #$style:color2$ }
.c3 { background-color: #$style:color3$ }
.c4 { background-color: #$style:color4$ }
.c5 { background-color: #$style:color5$ }
.c6 { background-color: #$style:color6$ }
.c7 { background-color: #$style:color7$ }

.status {
  font-size: 10pt;
  text-align: center !important;
  display: block;
  margin-bottom: 5px;
}

/* タイトルのデザイン修正 */
.title {
  font-size: 20pt;
  font-weight: 600;
  text-align: center;
  margin: 5px 0;
  color: #333;
  font-family: 'Helvetica Neue', Helvetica, Arial, sans-serif;
  letter-spacing: 0.5px;
  border-bottom: 2px solid #ccc;
  padding-bottom: 10px;
}

/* 残り設問数のデザイン修正 */
.progress-status{
  font-size: 15pt;
  margin: 15px 0;
  font-family: 'Helvetica Neue', Helvetica, Arial, sans-serif;
}

/* 進捗バー */
.progress-wrapper {
  text-align: center;
  margin-bottom: 20px;
}

.progress-bar {
  width: 400px;
  height: 12px;
  background-color: #ddd;
  border-radius: 6px;
  overflow: hidden;
  margin: 0 auto;
}

.progress-fill {
  height: 100%;
  background-color: #4CAF50;
  width: calc(100% * ($graph:total$ - $graph:remains$) / $graph:total$);
}

/* ボタン配置 */
.button-group {
  text-align: center;
  margin-top: 30px;
}

.button-row {
  display: inline-flex;
  gap: 10px;
  margin-bottom: 10px;
}

.button-group input {
  padding: 8px 16px;
  font-size: 14px;
}

/* ボタンのデザイン変更 */
input[name="next"],
input[name="previous"],
input[name="restart"]{
  background-color: #666;
  color: #fff;
  border: none;
  padding: 10px 10px;
  border-radius: 6px;
  cursor: pointer;
  transition: background-color 0.3s ease;
}

input[name="next"]:hover,
input[name="previous"]:hover,
input[name="restart"]:hover{
  background-color: #444;
}

/* 文字サイズ変更 */
input[type="text"],
textarea {
  font-size: 16px;
}

/* スマホ対応 */
@media screen and (max-width: 768px) {
  html, body {
    max-width: 100%;
    overflow-x: hidden;
  }

  table {
    width: 100% !important;
    table-layout: auto;
    border-collapse: collapse;
  }

  td, th {
    max-width: 100% !important;
    word-break: break-word;
  }

  input[type="text"], textarea {
    width: 100% !important;
    box-sizing: border-box;
  }

  .progress-bar {
    width: 100%;
  }

  .button-row {
    width: 100%;
  }

  .button-group {
    margin-top: 0px;
  }

  .button-group input {
    width: 100%;
    margin: 5px 0;
  }
}
</style>
コード:「進捗バー」「X問中のこりY問」の変更:html
下記画像のように、デフォルトデザインのhtml(左側)をカスタムデザインのhtml(右側)に変更ください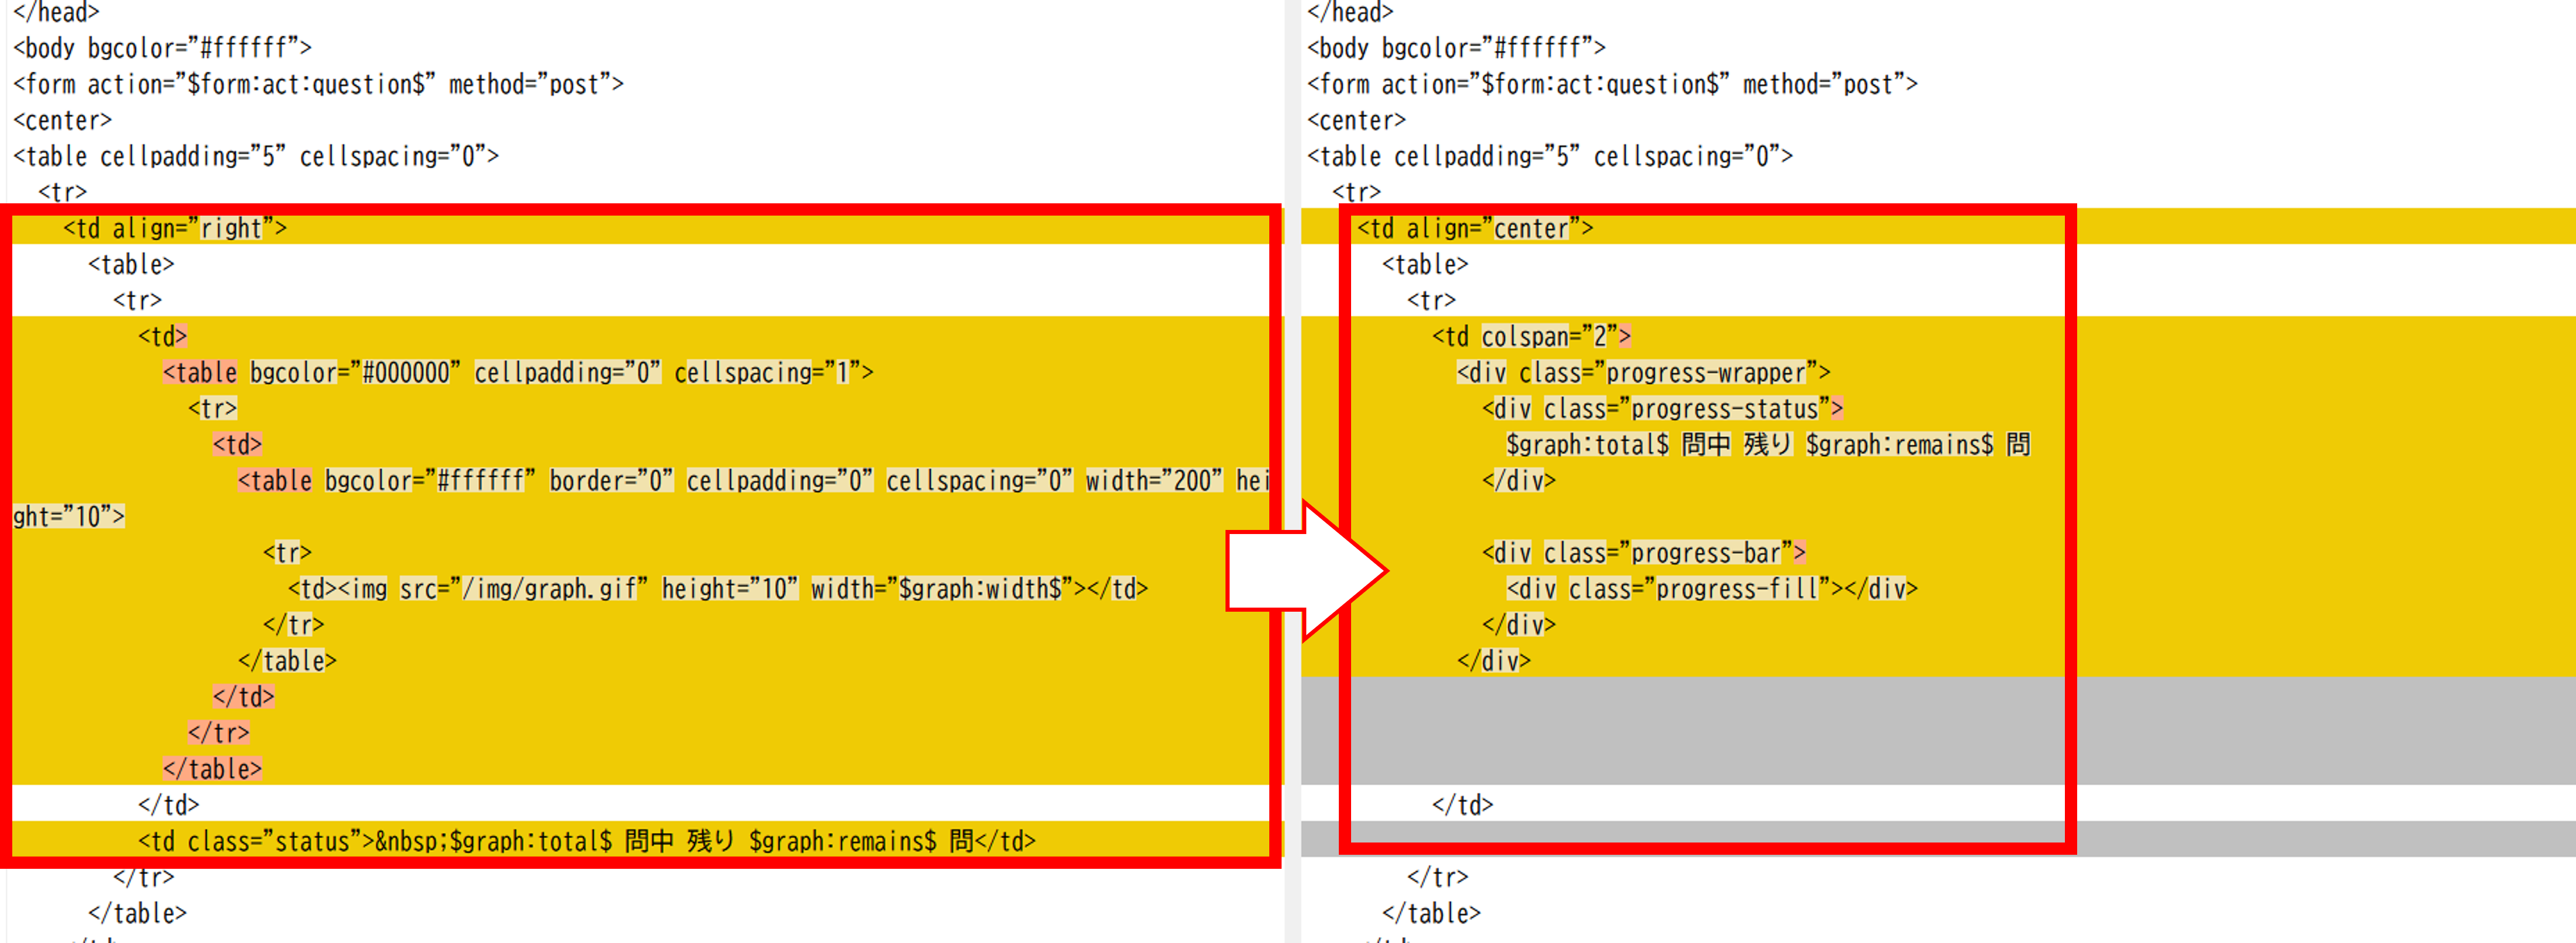
<td align="center">
  <table>
    <tr>
      <td colspan="2">
        <div class="progress-wrapper">
          <div class="progress-status">
            $graph:total$ 問中 残り $graph:remains$ 問
          </div>
          <div class="progress-bar">
            <div class="progress-fill"></div>
          </div>
        </div>
      </td>
コード:「次へ進む」「前に戻る」「最初から回答しなおす」ボタンの追記:html
下記画像のように、デフォルトデザインのhtml(左側)をカスタムデザインのhtml(右側)に変更ください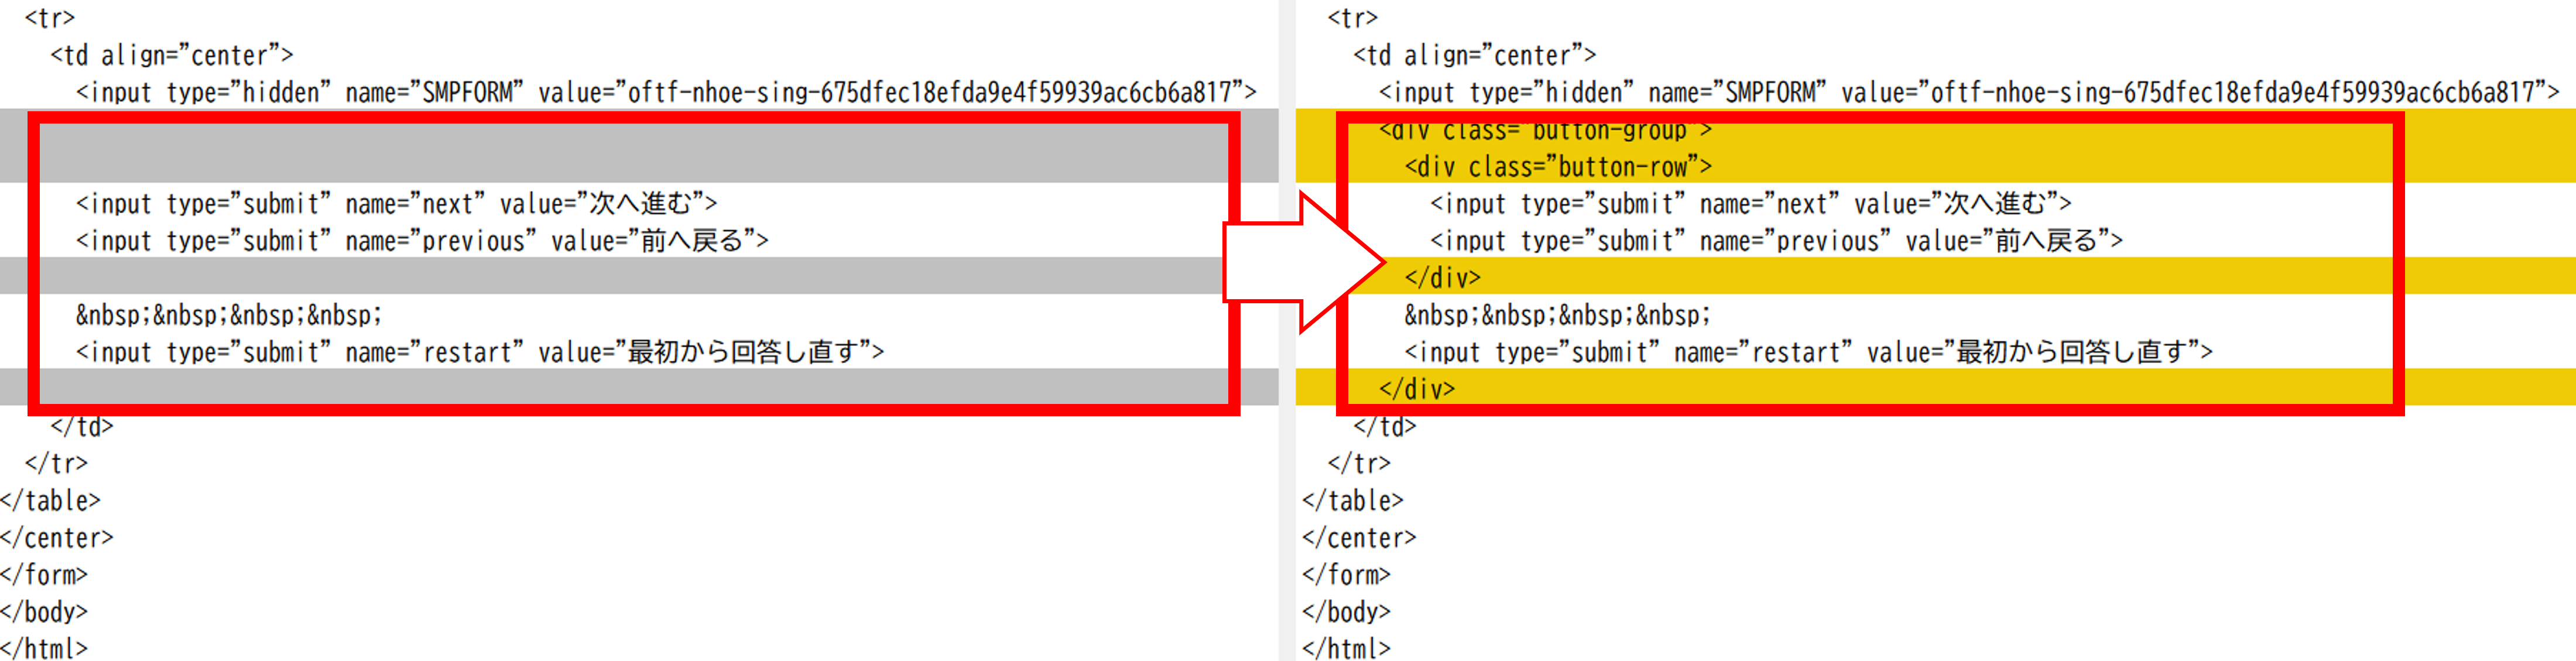
<div class="button-group">
<div class="button-row">
<input type="submit" name="next" value="次へ進む">
<input type="submit" name="previous" value="前へ戻る">
</div>
<input type="submit" name="restart" value="最初から回答し直す">
</div>
4.「変更」ボタンをクリックし、ページソースを変更する
以上を「Qx.(質問ページ)」すべてに設定に行い設定は完了です。「開始」「終了」「回答済み」「締め切り」「エラー」ページの設定
編集対象のページ
編集手順
編集手順は、下記画像の①~②の順番で操作します。
1.下記内容に編集
headタグの中に追記:meta
<meta name="viewport" content="width=device-width, initial-scale=1.0">
headタグの中に追記:style
<style>
input[type="submit"] {
  background-color: #666;
  color: #fff;
  border: none;
  padding: 12px 20px;
  font-size: 1rem;
  border-radius: 6px;
  cursor: pointer;
  width: 100%;
  transition: background-color 0.3s ease;
}

input[type="submit"]:hover {
  background-color: #444;
}

@media screen and (max-width: 768px) {
  html, body {
    max-width: 100%;
    overflow-x: hidden;
  }

  table {
    width: 100% !important;
    table-layout: auto;
    border-collapse: collapse;
  }

  td, th {
    max-width: 100% !important;
    word-break: break-word;
  }

  input[type="text"], textarea {
    width: 100% !important;
    box-sizing: border-box;
  }
}
</style>
2.「変更」ボタンをクリックし、ページソースを変更する
以上を「開始」「終了」「回答済み」「締め切り」「エラー」ページに行い設定は完了です。さいごに
アンケート全体のデザインを統一するためには、
「開始ページ」「Qx.(質問ページ)」「終了ページ」「回答済みページ」「締め切りページ」「エラーページ」のすべてを編集する必要があります。
その他のデザイン部分は、お好みのスタイルに変えられますので、お気軽にカスタマイズしてみてください。